Saturday, October 10, 2020

Sally

Start off by saying hi to everyone!! Iam really excited about this CAL we are doing . Sally was a pure delight she came together really good . She is 10 inches in circumference and 3 inches in height not including the wavy hair 😆 😆 😆
  
She is stuffed with fiber fill if you choose.  You can use other fillings. I used a 3.5mm hook . use stitch markers if you have them or do like me and use a piece of yarn . 

Start off with light blue . All of this project is using scrap yarn . Colors black white and red .  I love making amigurumi see it take shape before your eyes . The decorating part is the best. 

Pattern notes 
1. Only in round 1 you will do a slip stitch.
2. Continuous rounds for the remainder of the pattern 


Materials
Hook 3.5mm
Red heart super saver scrap yarn in ..
Black
Light blue
White
Red 
If dont have red heart no sweat 😓
Use what you have on hand 
Ornament hook (optional)
Fiber fill a good handful


Abbreviations
Sc. Single crochet 
Sc2tog single crochet decrease
Rd. Round
Slst. Slip stitch
Ch. Chain
Hdc. Half double crochet


Swatch
Repeats. Sc , sc2tog , hdc
Approximately
70 yards in light blue
7 yards in white 
24 yards of red
4 yards in black


shes standing on top of mr monsters head 
You would love this project monster cozy but you can find him in my ravelry store
Just wanted you to see there is an option to use wiggly eyes instead of crochet eyes . 
Can find them in any craft store I got mine at dollar tree my favorite store! ❤💚💜💙💛


Light blue 
Ch2 
Rd 1 in 2nd ch 7sc. (7sc)
Rd 2.  2sc in each (14sc)
Rd 3.  Sc , 2sc (24sc)
Rd 4. Sc , sc , 2sc ( 32sc)
Rd. 5. Sc , sc , sc , 2sc (40sc)
Rd 6.and 7. Sc in each (40sc)
Rd 8. Sc , sc , sc , sc2tog (32sc)
Rd 9. Sc , sc ,  (24sc)
Rd 10. Sc , sc2tog ( 16sc)
Add fiber bill dont over stuff
Rd 11. Sc2tog , sc2tog , sc2tog remove hook slst then add a little more fiber fill if needed then  handsew in the rest of the sew until sewn shut .


Eyes (2 of them)
Ch2
White
In 2nd ch 8hdc (8hdc)
Slst leave tail to sew in 

Pupils 
Using a piece of black yarn simply hand sew in 
I personally come from the back of the head to give the eye a more secure pupil .(watch video.


Nose 
Same as pupil
Using a piece of black yarn I hand sewn the nose start by entering in the back of the head . When you exit the back of the head to continue to the 2nd nostril just re insert the yarn needle being sure to grab yarn just a little so it's not seen in the back of the head 
(As seen here and in video for further instructions)
Here 


Lips 
Top lip 
Red 
Ch2 
3hdc in 2nd ch do not slst or break simply ch2 then 3hdc in that 2nd ch 
(Just ignore the 1st section like its not there )


Bottom lip 
Red 
Ch2 
3hdc in 2nd ch (3hdc)
Slst leave tail to sew on 


Hair
All I did was cut 14 strads of the red . You fill the hair section as full as your desire amount.
Simply cut sections of 6 or 7 inch strands. 
Using your hook simply fold the yarn in half 
Video on how to add hair https://youtu.be/l2rzXGLAhfc
Otherwise in my 2nd video I also show how you do it . 
As you can see the yarn is from a project I never finished. So because of that it curled. No curling iron needed 😆 😆 sorry I crack myself up sometimes . 
Last step to this fun project 
Not a must but adds another way if you don't have an ornament hook 
Ch21 coming back down the ch starting in the 2nd ch do a sc in each leave tail sew 2 ends together to form a loop then handsew in to top of Sally in the middle of the head. 


Friday, October 9, 2020

Seastar earrings

    This really cute idea came to me today trying to figure out new designs and for some reason I came up with earrings lol. Its a really fun quick gift for that special someone . I lucked out and had jewelry making materials already on hand but I know for sure you can get the hooks from any craft store. 
    I used to be in a jewelry business not too long ago and was gifted a jewelry kit in the package so I kept it figuring one day I might use it . 

    Have you ever used embroidery yarn its fun to use great for small projects. And inexpensive too for that matter

   Here is a picture of the finished items. I hope you like it.  Oh before I forget to mention I have another blog set up . This time its about me and my journey on living healthy and attempting to lose approximately 120+ pounds its long overdue. I chose to do something like this hoping to be accountable for myself and feeling better. This time Im not going to push myself so hard with the walking.
      So stay tuned and I will share when I get started on this journey on Sunday the 27th September 2020 . 
    
  Materials 
Lion brand bon bon color bright orange
Lion brand bon bon color bright pink
Embroidery floss color orange
Embroidery floss color pink
Embroidery needle 
Hook 2.5mm
Scissors

Abbreviations
Sc. Single crochet
Slst slip stitch
Ch. Chain
Rd. Round


With bon bon orange
Ch2
Rd. 1. In 2nd. 3sc (3sc)
Rd. 2. 2sc (6sc)
Slst to top of 1st sc do not break
3. Ch4 going back down chs slst in 2nd ch sc , sc then attach by slst in next st 
4. Ch4 going back down chs slst , sc , sc then attach by slst in next st 
5. Repeat number 3
6. Repeat number 3 
7. Repeat number 3 
Slst weave in ends 
You should have 5 point star 


Now take orange embroidery floss and attach fish hook 


Tuesday, September 22, 2020

cute slippers

Here is a quick pattern for the converse slipper!!! I made this slipper for a customer just recently for a 3 month old baby boy! 
Here is a written pattern for the sole of the slipper https://ravel.me/premier-sole
In it should give you the pattern for the sole for newborn to 12 year old 

Materials 
Hook 5.5mm size I
Red heart super saver white weight 4 
Red heart super saver skipper blue weight 4
Measuring tape
Yarn needle
Scissors

Abbreviations
Sc. Single crochet
Sc2tog. Single crochet decrease
Hdc. Half double crochet
Hdc2tog. Half double crochet decrease
Ch (s)  chain
Slst. Slip stitch
Flo.  Front loop only


Approximately 50 to 60 yrds of white
Approximately 110 125 yrds of blue

Swatch


For 3 to 6 month old baby
White
Ch8
Rd 1. In 2nd ch slst ,  slst ,  slst ,  sc , sc , sc , 8sc in last continue on other side sc , sc , sc , sc , slst , slst , slst 
Rd 2. Ch1 2sc in 1st 2 sts , sc in next 7 sts , 2sc ,2sc , 2sc , 2sc , sc in remaining 9 sts (28sc)
Rd 3.  2sc , sc , 2sc , sc in next 10 sts , 2sc , sc , 2sc , sc , 2sc , sc in remaining 11 sts (34sc)
Right now sole measurements are 3 1/2 in newborn size 
Rd 4. 2hdc , hdc , hdc , 2hdc , hdc in the next 9 sts , 2hdc , hdc , hdc , 2hdc , hdc , hdc , 2hdc , hdc , hdc , 2hdc , hdc in remaining 12 sts (42hdc)
Sole should measure 4 3/4 in 
Slst weave in


Side of sole 
Still using white
Attach white to middle of heel area
Rd 1.  Flo sc. ( 42sc)
Rd 2. Sc. (42sc)
Slst weave in ends
Now with blue or (main color)
Take the sole and fold in half

you can either use a stitch marker or not thats up to you
Working by attaching the blue towards the toes area and working back towards the heel.
Rd 3. Sc in the next 30 sts leaving rest undone (30sc)

Rd 4. Ch1 turn.   Sc.  (30sc)
Rd 5. Turn  Ch3 sk 2 sts in 3rd st attach by sc , sc in the next 22 sts there should be 3 sts left ch3 and attach to last st with sc 
Rd 6. Turn Going up ch3 area slst along it then sc 
in the next 19 sts sk 2 sts in last st sc 
You should be ending just before shoe lace hole
Rd 7. Ch3 turn sk 2 sts then sc in 3rd st , sc in next l6 sts ch3 sk 2 sts then attach by sc in 3rd st ( should have 3 sts left before attaching last sc in 3rd st)
Rd 8. Just like rd 6 slst back up ch3 area then sc in the next 16sts 
Rd 9. Ch3 turn sk 2 sts in 3rd st sc 10 sts ch3 sk 2 sts then in 3rd st sc by attaching
Rd 10. Slst back up ch3 area then sc in the next 9 sts then slst in last st 
Slst weave in ends


Tongue of shoe
White
Ch 2
1. 5sc in 2nd ch (5sc)
2. 2sc. (10sc)
3. 2sc , sc , 2sc , sc , 2sc , sc , 2sc , sc , 2sc , sc (15sc)
4. Ch1 


Sunday, August 23, 2020

Kurchow!!!

Hey guys!! Thank you for stopping by !!
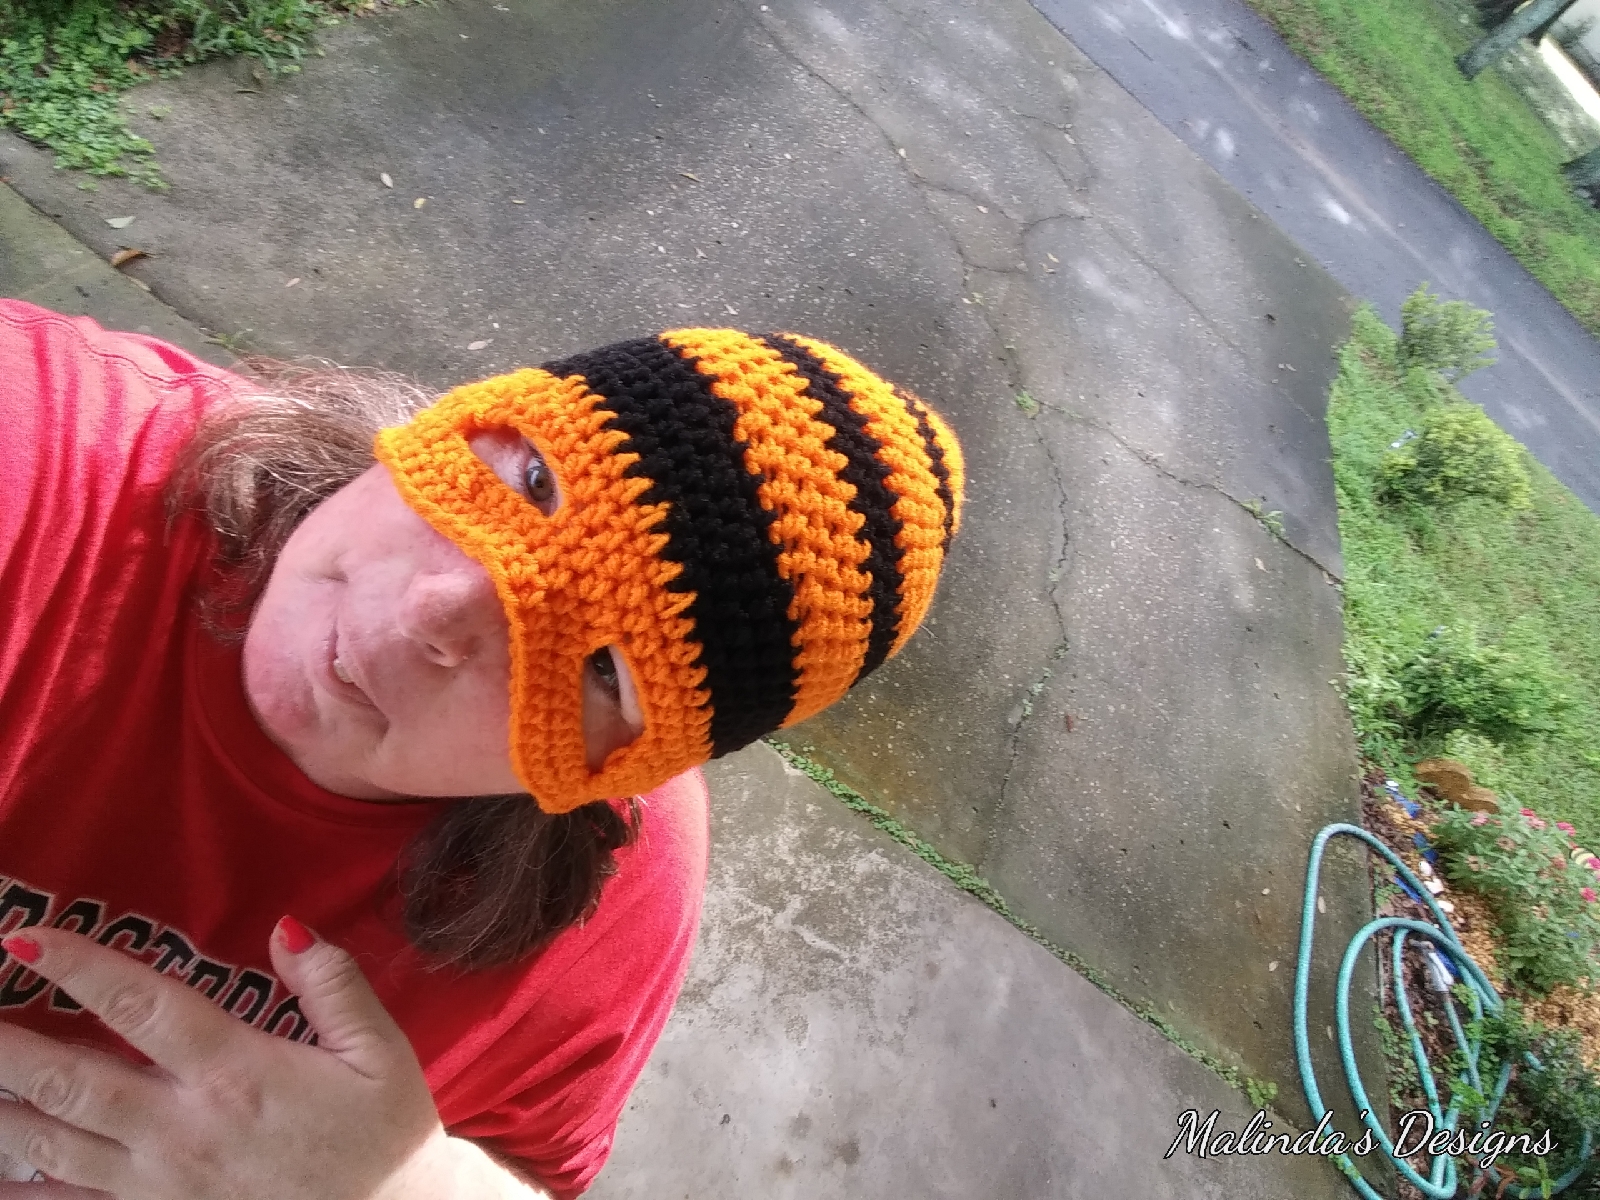
This design was basically a quick make no pun intended. I made this cool ski like mask because of a request given to me a couple weeks ago. From a friend of the family. All he wanted was the colors orange and black in it and from what I understand something to cover the face a little bit.


But as I was playing around with colors the more I thought about it I'm like we are in Florida we don't need a full face mask so I went ahead and made this.

Materials needed
Red Heart Super Saver black weight 4 120yrd
Red Heart Super Saver pumpkin weight 4 220 yrds
Hook size 5.5 mm
Yarn needle
Measuring tape

Pattern notes
1.  Each round is continuous rounds do not chain 2
2. After around 5. change the color black by simply hatching color to our last Stitch and doing a neat slip stitch
3. After two rows after rotate attached in the last Stitch pumpkin and simply follow the rest of the instructions
4. Pattern is fairly simple when attaching colors feel free to watch YouTube to understand how to do this.
5. In row 27 I simply placed hat over my head to get a basic judgment as to where to put the eye holes at. Once that takes place I simply stopped and continued crocheting the opposite direction.
This is creating the eye holes for the mask.

Abbreviations
Hdc. Half double crochet
Slst. Slip stitch
Ch. Chain
St. Stitch
Rd. Round


With pumpkin
Ch2
Rd 1. 5hdc in 2nd ch
Rd 2 . 2hdc. 
Rd 3 . hdc. 2hdc 
Rd 4 . hdc hdc 2hdc 
Rd 5 . hdc hdc hdc 2hdc
Change to black
Rd 6 . hdc hdc hdc hdc 2hdc 
Rd7 . hdc hdc hdc hdc hdc 2hdc
Change to pumpkin
Rd 8 . hdc hdc hdc hdc hdc hdc 2hdc
Rd 9 . hdc hdc hdc hdc hdc hdc hdc 2hdc
Rd 10 and 11.  Hdc in each
Change to black
Rd. 12 to 14.  Hdc in each 
Change to pumpkin
Rd. 15 to 18.  Hdc in each
Change to black
Rd 19. Hdc hdc hdc hdc 2hdc 
Rd 20 . hdc hdc hdc hdc hdc 2hdc 
Rd 21 to 23. Hdc in each 
Change to pumpkin
Rd 24 . and 25. Hdc. In each
Rd 26 . hdc in the next 24 sts then turn your work then hdc in the next 51sts 
Rd 27 . ch6 sk 5sts then attach by hdc then hdc  in the next 5 sts then ch6 sk 5 sts then attach by hdc and cont hdc in the rest of the rd 
rd. . 28. Hdc in each 
Rd 29 and 30. Hdc in each 
Slst weave in ends

Tuesday, July 28, 2020

pooh bear keychain


Gotta give you a little background as to why I made this cute creation! I was trying to think of something to give my boyfriend a little something for his birthday in a couple days . Something quick something easy to do . So I figure why not lets make a keychain. Hes my pooh bear so what better than a cute keychain so he sees it everyday.


Abbreviations

Sc. Single crochet.       Rd.  Round
Sc2tog. Single crochet decrease
Slst. Slip stitch


Materials
Wish milk cotton yarn colors
Red and gold
Use a very thin yarn in gold and red
Embroidery black thread (optional)
Can use other thin black yarn
Hook size 3mm
Embroidery needle
Yarn needle 
Scissors


Gold
Head
Ch2
Rd. 1. 3sc in 2nd ch (3sc)
Rd. 2. 2sc in each (6sc)
Rd. 3. Sc. 2sc.  (9sc)
Rd. 4 and 5. Sc.  (9sc)
Rd. 6.  Sc ,sc , sc2tog ,sc , sc sc2tog (6sc)
Rd. 7. Sc ,  sc2tog , sc ,  sc2tog (4sc)
Rd. 8. Sc2tog till closed
Slst weave in 
Set aside


Muzzle
Gold
Ch2
Rd. 1. 4sc in 2nd ch. (4sc)
Rd. 2.  2sc in each. (8sc)
Slst leave tail to sew in 


Ears 
Gold
Ch2 
4sc in 2nd ch 
Slst leave tail 

Next I set aside all that I did so far but you can go ahead and assemble 
Sew on the 2 ears 
Sew on the muzzle 
Take embroidery thread whatever you choose and sew in 2 eyes and a nose

Body 
Ch2
Gold
Rd. 1. 4sc in 2nd ch. (4sc)
Rd. 2.  2sc in each. (8sc)
Rd. 3.  Sc. , 2sc.     (12sc)
Rd 4 and 5.  Sc.   (12sc)
Rd. 6. Sc ,  sc. ,  sc ,   sc 2tog. (12sc)
No its not a mistake I want 4 decreases for round 6 
Change to red 
Rd. 7. Sc ,sc , sc2tog ,sc ,sc , sc2tog ,sc ,sc ,sc2tog (9sc)
Rd. 8. Sc. (9sc)
Leave undone with a tail to sew head on 
Simply attach head

Arms (2)
Gold
Ch2
Rd. 1.  2sc in 2nd ch. (2sc)
Rd. 2.  2sc. (4sc)
Rd. 3. Sc.  (4sc)
Rd. 4. Change to red. Sc. (4sc)
Rd. 5.  Sc.  (4sc)
Slst leave tail
Sew in 1 on each side 


Legs (2)
Ch2
Gold
Rd. 1. 2sc in 2nd ch. (2sc)
Rd. 2.  2sc in each. (4sc)
Rd. 3. To 6. Sc in each. (4sc)
Slst leave tail 
Sew in 


Saturday, July 11, 2020

crochet heart ring


Here it is !!! A cute ❤ heart ring 💍 I absolutely love how this came out! How about you ? Do me a favor and subscribe to my YouTube channel Malinda's Designs !

Materials needed for this project
Hook 3mm
Cotton yarn of any kind
I used wish cotton yarn in
Pale yellow and peach
Scissors
Yarn needle
Measuring tape

Abbreviations
Sc. Single crochet
Hdc. Half double crochet
Tr. Triple crochet
Slst. Slip stitch
Rd. Round
St. Stitch


I used peach 
Ch 15
Adjust the amount of chains to the exact measurements taken
Rd. 1.  In 2nd st *sc ,  tr. ,  hdc , *  repeat *to* last st should be hdc if you did ch15 slst weave in ends


Now take pale yellow
Ch5
In 2nd ch. Slst ,  5hdc in same st ,  hdc ,  hdc , now on other side. ,  5hdc ,  hdc , hdc , slst in last next leave tail 
Take yarn needle and sew in by going down the middle of the heart ❤ coming out tip this will help form the heart ❤ now sew on to ring 💍 weave in ends 

Friday, May 22, 2020

Easy crochet craftshow favorite headband

Hi my name is Malinda and thank you for stopping by to see my newest design! I'm a crochet fanatic so I love creating. What makes this a unique design is the simplicity of my design . I simply used a combination of stitches. I used a single crochet and a triple crochet to make a unique texture. 
Please give this design a 2 thumbs up in the comments. 

If you dont mind those that test my pattern I will be giving you a shout out on Instagram and my YouTube channel . If you are not following me already my Instagram handle is @creationbymalinda
Here is my YouTube channel of this design simply subscribe and hit the bell so you can get notified when I share my next creation. 
I started something new on my channel I do a shout out to anyone leaving an awesome comment during one of my videos.
You also can take a screenshot of my channel and share it on your Instagram story just be sure to tag me in it . In return during my next video Ill be sure to shout your name/business!
Now down to business

Pattern notes
1. My newest stitch creation thats the brownee stitch https://youtu.be/KpWBEYnn0s4
Simply do alternating stitches of single crochet and triple crochet.
2. Be sure when starting the round of the brownee stitch you ch1 in the beginning and ch3 if starting off with a triple crochet.
3. I simply left round 1 unattached because you will be slst together and then ch2 and working on the other side then continue by doing a double crochet.
4. If you rather not add a flower you dont have to but it is a cute touch if I may say so .


You can change the color and hook size if you need to.
Approximately 180 to 200 yards is needed for this headband.
I didn't take time to figure exactly but here is a video on how I figured out yardage for a pattern .
Keep in mind that hook size and yarn weight makes a difference.


2 different hooks used in this pattern and that 6.5mm and 5mm
Red heart yarn soft amethyst 
Maybe a yard in light purple
Yarn needle 
Tape measure


According to craft yarn council my go to for all my measurements. It states for a woman's head circumference is 21 to 23 inches or 53 to 58 cm .


Abbreviation
Rd. Round 
Ch. Chain
Slst. Slip stitch
Sc. Single crochet
Tr. Triple crochet
Dc. Double crochet
St. Stitch


With hook 6.5mm
Amethyst
Ch70
Rd. 1. In 2nd ch sc then in next tr. * sc , tr , * repeat *to* until end of rd (68)
Attach both ends by slst and ch2 after 
Now working on other side.
Rd 2. Dc in each (68dc)
Rd. 3. Ch1. *Sc , tr , * repeat *to* (68) 
Rd. 4. Ch2. Dc2tog, dc2tog ,  dc.  in each (66dc)
Rd 5. Ch3. *tr ,  sc *,  repeat *to* (66)
Slst weave in ends


Flower 🌼
Using 5mm hook 

Light purple
Ch2
Rd. 1. 5sc in 2nd ch (5sc)
Slst set aside
Amethyst
Ch2
Rd 1. 7sc in 2nd ch (7sc)
Rd 2.  Ch1 (sc dc dc ch2 dc dc sc.) all in same st slst in next st then all in the next st (sc dc dc  ch2 dc dc sc )slst in next st then next st (sc dc dc ch2 dc dc sc ) slst in next then next st (sc dc dc ch2dc dc sc ) you should have 4 petals 
Slst and set aside
Ch 2
Rd 1. 6sc in 2nd ch (6sc)
Rd. 2. 2sc in each (12sc)
Rd. 3. Sc , 2sc. (24sc)
Rd 4. Ch1. ( sc dc dc ch2 dc dc sc ) in same st. Slst next * ( sc dc dc ch2 dc dc sc ) same st slst next * repeat 4 more times 
Slst leave tail long enough to sew in each layer and into headband .
When sewing each layer just sew to secure it not every single spot.


Baby boy blanket

 Granny squares are fun to make. Sure it has you crocheting in a square form but it later makes a beautiful creation. I made this baby blue ...